Showing posts with label paint. Show all posts

Thursday, September 22, 2011

to paint or not to paint?

* paint brick fireplace!

that's on my project to-do list.

it should have been checked off by now so that
it would be ready for use this winter.


it's not.

i'm generally not one to shy away from slapping
paint on anything but for some reason
i feel tentative about painting the brick.
does that mean i shouldn't do it?

after we moved in i immediately painted the shiny brass
fireplace insert black.


that was easy and greatly improved things.
but in the back of my mind i knew i'd eventually paint the brick.

in anticipation of painting it this summer i cleaned her
out really well in the spring and removed the big
honking insert.

this is how it sits now.


when i took the insert out i realized i'd done a rotten
prep job before painting it. note the black rim around the opening.

so, now, i have to paint the brick.
right?

i do like the warmth of brick. i think i'm afraid i'm going to want
it back and this is one paint job you just can't undo.

however, every time i see a painted brick fireplace, like this one from


 i'm ready to pull out my brush!

i also love the brick treatment in this kitchen.

and this whitewash treatment is great.

source

what to do, what to do?

i'm leaning toward a whitewash so that some of the warmth
of the brick will come through.

any opinions? i'm wide open.

~stacy~


Wednesday, September 21, 2011

a shot of red


One year ago my family moved into Quinby Cottage.

Since then we have been busy trying to make this downsize
work for our family of five by creating a warm
and functional space.

We're getting there.
You can see a little of what we've done
here, here, and here (where she's all cleaned up for Christmas).

We've knocked out wall's, pulled out kitchen cabinetry, painted,
put up board and batten and horizontal planks, and changed out some lighting.

There is still so much more to be done and I've been in a bit of
a diy rut lately!
I knew that in order to get out of the rut I needed
to tackle a quick project that would provide instant
gratification. And it needed to be cheap.
So, I finally painted our front porch swing.


My mom and dad gave us this swing the week we moved in and it's
been on my long "project" list ever since. It was the perfect project
to get me going again.

I decided to paint it the same red as our front door, which I had on hand.


Nothing like an easy update that packs a punch to
get the diy juices flowing!


It's time to re-visit my project list and get busy!


Stay tuned!

linking up with The Shabby Nest for Frugal Friday.

Tuesday, February 15, 2011

at long last

i love red doors.
on homes.
on churches.
on quirky old delapodated buildings.
love them.
always wanted one.

finally, after perusing photos of yellow homes
with red doors i decided to go for it.


i love how all the colors come together.
yellow house, red door, blue porch ceiling.
(i realize i took these photos at the worst time of day - shadows
and all - but i had to take advantage of my three free minutes!)


i didn't want to spend money on a new
door handle and lock (it was brass) so
i took it off and painted it.


the finish came out great.
first i spray primed it with kilz,
then sprayed three coats of rustoleum's
hammered bronze, then followed it
up with three coats of deft's spray
lacquer.


BEFORE


AFTER


now, we just need a little spring green to liven things up!

i'm linking up to coastal charm and domestically speaking.

Sunday, August 15, 2010

lake side

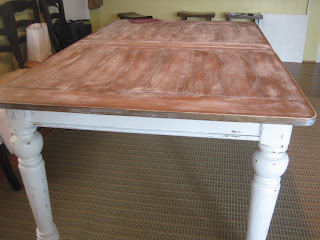
pastor j and i took the boys to my aunt and uncle's lake house last week. our plan was to spend the week but that was cut short. really short. we had to leave on day two. more on that in a later post. before we left i was able to crank out a new look for their dinner table. i did this for two reason's. one, as a thank you to my aunt and uncle for their generosity. they make their lake home available to us on a regular basis and  i have been wanting to do something for them as a thank you. when she told me she really liked the treatment i'd done on my own table i knew just what to do. and, two, i, apparently, cannot go a day without painting something!

their table is a bit different than ours, different grain and it had vertical and horizontal grooves. i changed up the treatment just a little for that reason and because it's at the lake. i wanted it to have more of a coastal feel, rather than a farmhouse feel, like mine.

my view while painting. foggy and beautiful!


i decided to do a white wash technique.
here's what i did. . .

1. lightly sanded everything. not a lot, just enough for the paint to grab hold. and i wanted to maintain the color for it to peak through on the table top.


2. painted the legs. two coats.


3. dry brush technique on top. using 1/3 paint and 2/3 water, dip the brush and wipe most of it off then run the brush in the direction of the grain.


4. i let that dry and did a second coat, then a third.

5. using my palm sander i roughed up the legs. using a 220 grit i hand sanded the top until achieving the look i wanted.


6. because it's a dinning table and it's white i used deft wood finish to finish it off. deft won't yellow like polyurethane and leaves a nice smooth finish. it is glossy so you may want to run some 220 grit sandpaper over it ever so lightly if you want a more worn look.


it really brightens up the room and fits the rest of the space beautifully!


this 'after' shot was taken as we were gathering our things to run out the door. kids were in the van, pastor j was grabbing last minute items and i stopped to take a quick shot. pastor j doesn't even say anything anymore. he just looks at me and shakes his head.

i'll tell ya why we had to make a dash for it next time!


i'm linking up with cottage instincts, between naps of the porch, domestically speaking, mustard seed creations, life in the fun lane, and funky junk interiors.

Tuesday, August 3, 2010

it's the little things, y'all

while i was watering some plants on our front porch today
i got a good look at our doorbell.
in a word. blah.
it's just cheap yellowed plastic.


suddenly it really bugged me. i mean, really bugged me.
i know, i have issues.


so what does a paint obsessed person like me do?


paint it!

i just unscrewed it, disconnected it and put a coat of primer on it followed by a coat of black.
i sprayed the screws, too, so they would blend better.
i even put a couple coats of wipe-on poly on it to protect if from my boys sticky fingers.

so much better, don't ya think?
i'm sure no one, including my husband, will notice.
but that's okay.

it makes me happy.


now i can water my plants in peace.

linking up to domestically speaking and shabby chic cottage.

Thursday, July 15, 2010

the magic of paint

Do you have any pieces of furniture in your house that you look at and ask, why? Why did I get that? Why do I still have it? Why haven't the ugly furniture police come and taken it away?

Of course you do! We all do, right? Pieces that we acquired in college that have made every move with us. Pieces that entered the marriage with our spouse. Pieces that were passed on by family members when we were trying to furnish our first home.

Fortunately, there are no ugly furniture police and, fortunaely, paint can do wonders for some of the sad pieces sitting around our home!


One of my favorite re-do's from my own home is a honey colored Thomasville dresser that my parents passed along to us. This piece is not ugly, the color was just a bit dated for my taste. I knew with her great lines she would look great all dressed up. Here's an example of what a little paint can do.
This very easy change totally updated the dresser, the room and the total cost was a can of paint. What? $30 or so? I don't remember. The color is Behr's Paint and Primer in One, Creamy White. The top is stained with dark walnut and the handles I spray painted a hammered bronze. I love this dresser now, it's one of my favorite pieces in the house. And it's oh-so-satisfying to know that I was able to get the update I wanted without spending much money. It was also what really set me off on my love of painting furniture.

So, look around. What do you have that could use a face lift?

One of my client's is taking the plunge with painted furniture. She is expecting her first baby and wants to create a beautiful nursery with pieces she and her husband already have, many of which have been collected through the years from various sources. I stopped by a couple weeks ago to take a look at her space.
We decided to take an old liquor cabinet and turn it into a changing table.


The cabinet was being used as something of a catch all anyway and is the perfect height for a changing table. It's a little dated and not very babyish so we loaded her up to get a makeover. After two weeks in my studio, aka garage, I am getting to work. Let's take a look at this thing.


Look at that. The top opens up. You know, so you can mix and serve the drinks. Not really necessary for baby's room so we are just going to ignore this little feature and leave it closed. The top is in pretty rough shape but that's nothing a little sanding and paint won't take care of.


Here's a look at the inside. On the left is a pull out shelf thingy for. . . drink paraphernalia, I guess? I thought about removing the whole thing but then decided it will make for nice organizational  space.


I think the right side is big enough for a small trash can and the cubicles are perfect for small baskets to hold diapers, burp clothes, etc. And I'm on the hunt for some small cups (would love to find something silver) to drop into the holes up top for cotton balls, alcohol pads, cotton swabs, etc. won't that be perfect?
I'm excited about fixing this up for my client.

I brushed Valspar's Farmhouse Blue over one of the doors today to see how I liked it. Here's a sneak peak.


I think it's going to look great! And I have the perfect knobs, too!

Now I have to get to work. Monday is my self imposed deadline, but I know three little guys who might have something to say about that.